A few months ago I had my hubby install me a clothes line. Now when my mom heard this I think she thought I had lost my marbles (LOL!). I didn't and it wasn't my hubby's idea, it was mine. So we headed off to Home Depot and found these really neat retractable clothes lines and my awesome hubby installed them on my covered porch. No bird ickies on my clothes! They are really neat you pull them across and tie them off to use them they stay tight and don't droop. When you are done you just untie them and the roll back up into the spool and they are out of sight!
What started this clothes line idea well I heard that the dryer is one of the most expensive appliances to run and I run mine daily. We are a family of four and the laundry is just a never ending thing! So I figured that if maybe a few times a week if I could skip the dryer and let God's dryer do the work we might save a few bucks. Well here are the results I have managed to use my clothes lines a few times. Every time I go to hang clothes it rains and clothes don't dry in the rain. Nevertheless I have persevered and used that line. Our monthly bill decreased the first month by $60.00 and the next month even with us running the a/c daily my bill was $28.00 less so I guess it is making a difference. I hope to use my lines more this summer now that it is not raining daily! What do you do to save a dime?
Remember to have a Faith Filled Footsteps kind of day!
Sunday, June 30, 2013
Saturday, June 29, 2013
Tunkey Monkey Giveaway from Life With My Two Kids!
Sponsored By: Tunkey Monkey's Sweet Treats
What you will win: $100 toward Tunkey Monkey's Sweet Treats
Who can enter: United States 48 Continental States* ONLY,
Who doesn't love to win a sweet treat enter below to get the treats you love!
*Alaska & Hawaii not eligible to win, sorry!
Friday, June 28, 2013
Making it NEW!
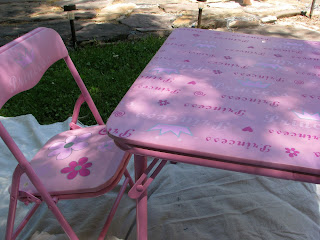
I am not a keeper of things! But in this case I knew that this old table could be redone and reused by my younger child!
When my daughter was younger she received a table and chair set from her Nana and Pap and man did she use that table. It was well loved and well used! This was a hot pink table and chairs with Princess pink and silver print! Now my son is not a fan of hot pink and princess so we set out to redo this set to make it a little more boy friendly!
I started off by taking the cover off the table and chairs and cleaning them. Then scrubbed down the frames and found a spray paint for metal.
We used Krylon in a dark satin blue. Blue is my favorite color so I use it a lot! It took 3 coats of the spray paint to cover the original hot pink paint.
The first coat made the set look purple so a few coats was necessary to get the beautiful blue I wanted. But it turned out wonderful. Trick to spray painting don't get to close and use wide sweeping motions so you don't get drips and blotches!
Now to tackle to cover and seats. This original table cover had a few holes in it and needed some love. I decided that fabric would be the best cover for the old table. I found a really cute and inexpensive fabric at my local Walmart. It was about $3.00 for the yard of fabric and then I found a pack of craft vinyl to cover the fabric for a total cost of $5.00!
All you need to do is lay the item your are covering face down and pull the fabric snug over the item and using a heavy duty stapler staple the fabric securely down.
I used a hammer to make sure the staples are in all the way and flat! Once all the pieces are covered in fabric I do the same thing with the vinyl.
Then finally you just assemble it all back together and you have a brand new table and no one will ever know it was a hot pink princess table and not a super cute blue robot table and chairs!
What do you have in your basement that needs to be reused and redone! I know I have a few more things to tackle and I can't wait to move onto the next one!
Remember to have a Faith Filled Footstep kind of day!
Thursday, June 27, 2013
Sanus and Safe Kids TV Safety!
SANUS and Safe Kids Worldwide
Launch TV Safety Initiative
For many Americans, a flat panel TV is a great way to enjoy family time and entertainment. However, most parents are unaware of the safety risks that flat panel TVs pose for kids. Due to increasing size and new ultra thin designs, today’s flat panel TVs can easily tip over when bumped or pulled, toppling off of furniture and causing injury or even death.
Wednesday, June 26, 2013
Baby Blanket Music By Mommy's Craft Obsession!
Hosted by Mommys Craft Obsession
June 26-July 9
There is nothing more soothing for your little one than a beautiful lullaby, but lets face it, those lullaby's can get a bit repetitive. Baby Blanket Music features YOUR favorite artists/bands in a lullaby! Now you can hum along to songs that you love while you're rocking your precious little one to sleep.
I am am music lover and it seems that my kids have gotten that love from me my little guys bounces and shakes to all music he hears. Hope you love this music!
Enter to WIN a Baby Blanket Music CD of your choice from Mommys Craft Obsession
& Baby Blanket Music!
The Giveaway will close late on the evening of July 9th. The winner will be
chosen at random through Rafflecopter which uses Random.org. The winner will be
announced both on Rafflecopter as well as MCO’s Facebook. The winner will have
their prize sent to them by Baby Blanket music, Mommys Craft Obsession and other
participating bloggers are not responsible for prize shipment. Must be 18 years
and older. Facebook, Twitter, Pinterest, and Google are in no way affiliated
with this giveaway. No Purchase Necessary. US Only.
Tuesday, June 25, 2013
California Delicious $50.00 Gift Certificate from Mommy's Craft Obsession!
Hosted by: Mommys Craft Obsession
Enter to win a $50 Gift Certificate to California Delicious! California Delicious
believes that life is an occasion worth celebrating, so they take pride in
having fantastic gift baskets for every occasion! Enter to win a $50 Gift
Certificate using the form below and give yourself a special treat or share it
with a friend!
Who doesn't love to win a gift certificate you can use it to purchase any itme you may want to keep for yourself of for a gift for a friend. We hope you find something you love!
The Giveaway will close late on the evening of July 9th. The winner will be
chosen at random through Rafflecopter which uses Random.org. The winner will be
announced both on Rafflecopter as well as Mommys Craft Obsession’s Facebook. The
winner will have their prize sent to them by California Delicious, Mommys Craft
Obsession and other participating bloggers are not responsible for prize
shipment. Must be 18 years and older. Facebook, Twitter, Pinterest, and Google
are in no way affiliated with this giveaway. No Purchase Necessary. US
Only.
Monday, June 24, 2013
Printable Party Packs Review & Giveaway!
"I love throwing parties but was often frustrated that I couldn’t find the décor that I was searching for. Solution? Design my own! I love the creative process of design. Designing custom kits allows me to provide you with fun décor that gives you all you need to decorate your party! Party Packs are a fun, easy way to celebrate your child's birthday! Simple do-it-yourself crafts allow you and your child to create their own custom celebration that you'll both remember for years to come. Have fun and get crafty!" ~Jenny
When I have a party I am one of those people that like it to be super creative and look like I really put some time into it. This past week I had a 2nd birthday party for Little Man and it was a hit! This year I didn't spend hours making signs and creative little things to fit the theme for my party but I have to say it was the cutest party ever and I have Printable Party Packs to thank for that!
Printable Party Packs is the super neat company that makes customizable party packs. They have all kinds of different themes and they can customize yours to make it look like perfection!
After scrolling through all the party pack packs we went with the Construction pack. It included invites, thanks you cards, water bottle wraps, napkin wraps, goodie boxes, hats, straw slides, signs, table decorations, customized banner and cupcakes picks. All you do is pick the party pack you want and she makes it personal! No fuss and no stress!
To finalized your pack you will recieve an email for confirmation on the customizable parts. Then you print it! It is that EASY! Then all you have to do is cut it out and make your party look like you spent hours and hours on the decorations!
I had so many comments on all the work I did and how cute my party was and guess what I didn't spend hours I spent just minutes making it look just PERFECT! I can tell you never again will I spend all that time making it myself I will be using Printable Party Packs year after year!
Here are some sample of all the goodness on her site!
Here are just a few shots of how my party pack turned out for my personal party!
Super Cute Cupcake Picks! |
Signs for all the Stuff! |
Sign for my wreath to welcome all my guest for the party! |
There are so many options to choose from on her site! I just know you will find the perfect
Printable Party Pack for your next party!
To Purchase: Visit Printable Party Packs and find the Perfect Party Pack for you. Please let them know we sent you!
To Win: Faith Filled Footsteps & Printable Party Packs are giving two lucky readers a Printable Party Pack of your choice. We are giving away on boy and one girl Party Pack so make sure you enter the correct entry form below! Enter the Rafflecopter below!
a Rafflecopter giveaway
The Giveaway will run from June 24, 2013 and close late on the evening of June 30, 2013. The winner will be chosen at random through Rafflecopter which uses Random.org. The winner will be announced both on Rafflecopter as well as Faith Filled Footsteps Facebook. Faith Filled Footsteps is not responsible for prize shipment. Must be 18 years and older. Facebook, Twitter, Pinterest, and Google are in no way affiliated with this giveaway. No Purchase Necessary. US Only.
*Faith Filled Footsteps has not received monetary compensation to promote this giveaway.
Sunday, June 23, 2013
Tiny Love 3-in-1 Rocker Napper Giveaway!
Welcome to the Tiny Love 3-in-1 Rocker Napper Giveaway!
Thrifty Nifty Mommy reviewed the Tiny Love 3-in-1 Rocker when her son was a newborn. Read her review here. Then, enter to WIN a Tiny Love 3-in-1 Rocker Napper in one of the new fashions!
June 23rd-July 7th, 2013
Enter daily using the Giveaway Tools form below!
Giveaway open to residents of the US only.
*Disclosure: I have not be compensated to share this giveaway. Tiny Love is responsible for shipping this prize to the winner.
Saturday, June 22, 2013
Cheese Pie!
When we moved from Maryland to West Virginia in 1998, I had never heard of this recipe! It has since become a go to for my family. We love Cheese Pie! So I figured I would share this one!
What you need:
1 package of room temperature cream cheese
1/3 cup lemon juice
1 tsp. pure vanilla
1 can Bordens Sweetened Condensed Milk
1/2 tub of Cool Whip
1 Graham Cracker Crust or Oreo Crust
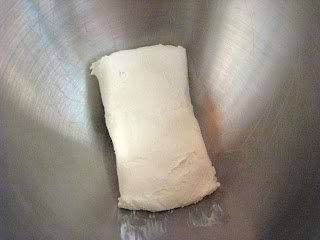
Take the room temperature cream cheese (the temperature is important if not room temperature it will be lumpy and have a gross texture!) and add to the mixer.
Add the Sweetened Condensed Milk and mix until creamy.
Add the vanilla and then the lemon juice (add the lemon juice last because it can make the cream cheese lumpy also!)
Once the mixture is well mixed and creamy add a half a tub of Cool Whip and lightly whip until mixed! You can serve this without the Cool Whip but it makes it lighter for summer.
Add the whipped mixture to the crust of your choice! Refrigerate for at least 4 hours so it sets.
Friday, June 21, 2013
Birthday Wreath!
As you know I love me some wreaths! I saw this one at Michael's recently and they wanted $90.00 for a 12 inch wreath! FORGET THAT! I made this one for about $25.00 and it is 16 inches and just wonderful for my sons upcoming birthday party! I did peak at the one at Michael's to see how they did it and I changed mine a bit to make it super easy!
What you need:
12-16 inch Styrofoam wreath
Roll of birthday streamer
250 stick pints
250 balloons in the colors of your choice
Ribbon to hang wreath
Multi-color pipe cleaners
Take your wreath base and wrap in the birthday streamer covering the whole wreath twice to make it pretty. My daughter helped with this it made it super easy to wrap neatly with 4 hands. You will see part of this wreath underneath the balloons so make it neat and tidy.
Once you have your wreath wrapped pin the loose streamer down. Then take your balloons and in a random pattern fold them in half and push a pin in the middle and stick them to the covered wreath. This is the hardest part. My fingers hurt after all the stick pins remember to make it full. I just covered the front of mine it looked good as long as I pinned the balloons close to the edges!
Next take a pencil and wrap the pipe cleaners around them creating a springy effect. Leave enough of a tail on the pipe cleaner to push into the wreath! This is why I wrapped it in streamers instead of ribbon. The ones at Michael's were wrapped in ribbon and then you had to try and pin a pipe cleaner (NOT EASY!) but with the streamers the pipe cleaners pushes right through in the Styrofoam. Fluff to desired fullness.
You can either wrap the ribbon hanger over the balloons or you can leave a blank spot and hang the ribbon and then go back and cover with balloons this is what I did!
This was super easy and I just know it will be a hit! Let me know how yours turn out!
Subscribe to:
Posts (Atom)